Sunday, 22 June 2014

Moonlight and Chevrons

Here's a card made using one of the new DSP stacks - Moonlight.
I do so love the colour combo - 
Basic Gray,   Hello Honey, Lost Lagoon, Smoky Slate,and Whisper White.


I decided to team it up with chevrons punched out of card stock in
 Hello Honey, Lost Lagoon, and Smoky Slate, which I paper pieced into a strip of
 Whisper White that had been punched using the Chevron punch.
This was then stuck on top of a strip of Basic Gray.
The ribbon is a sneaky peek from the new catalogue too - really rich colour - Hello Honey
and the sentiment is from Teeny Tiny Wishes.

Saturday, 21 June 2014

Work of Art - sneak peek.

Today has been my monthly Saturday morning workshop and my friend (and down-line), Cheryl
brought a few cards that she had made using the new Work of Art stamp set.
(This will be available when the new catalogue launches  on 1st July)
I have cased this card from Cheryl, using the same colours and basic design,
but I didn't have the stamp set that she had used, so I used Serene Silhouettes instead.


Colour combo is Crumb Cake, Coastal Cabana, Pool Party Soft Sly and Smokey Slate,
stamped on Very Vanilla card stock then matted onto a base card in Crumb Cake CS.
The sentiment is from Bloomin with Kindness.
Thanks Cheryl - I love this card!

Friday, 20 June 2014

Another Merry!!

Been busy today with clearing out my bedlinen closet and airing cupboard, so I did loads of washing to freshen things up and they have dried nicely on the line in the fresh air.  I love the smell of clean linen!!
I haven't therefore had much time to play, so whilst I was eating my lunch, I had the idea to
do a doodled diamond card.  Here is the prototype - it still needs more work, but it's coming along nicely!


Colour combo is Mossy Meadow - fast becoming a favourite!!, Cherry Cobbler and White.
The baubles are punched with the Merry Minis punch pack in Red Glimmer paper -
I do love this - it looks so rich.
The sentiment is from "Wishing You" stamp set, and I just used a Cherry Cobbler
stampin write marker to ink up the words on the stamp as I needed the - missing out the
word Merry altogether and replacing with the Expressions Thinlit.
I can see that it needs more work doing - will play with this again!

Thursday, 19 June 2014

Merry

Here is the second card that Chris and I made yesterday afternoon.


Colour combo is Cherry Cobbler, Mossy Meadow (I think this is a lovely rich Christmas green),
Crumb Cake and White.
Once again the word "Merry" is from the Expressions Thinlits dies, 
cut from red Glimmer paper- doesn't it look luxurious.  
The word Christmas is from one of the stamps in the More Merry Messages stamp set
The banners are cut from scraps of retired SU Christmas DSP and the button is from my SU stash.
Cherry Cobbler Bakers twine was wrapped round the top layer and threaded through the button also.
That's two Christmas cards made in one week - must be on a roll!!

Wednesday, 18 June 2014

Love!!

Today I have been over to Chris's (sis-in-law) to have a crafting day together.
We both bought the Expressions Thinlits dies from the Clearance Rack.
(They are still there if you fancy having them too!)
I took a photo of a card on display at Telford last month and used that for inspiration.
Here's my version.


 Colour Combo is Coastal Cabana, Smoky Slate and Crisp Cantaloupe
Stamp set is Hearts a Flutter, hearts cut with matching Framelit dies.
Expressions Thinlits dies used to cut the word "love"
Bakers Twine and Basic Rhinestone embellishments.
The flowers are made with 3/8" Ruffle Stretch Trim in Crisp Canteloupe.
I "love" this card!!


Tuesday, 17 June 2014

Happy Anniversary!

Here's an anniversary card that I have made for friends of ours.


A very CAS white on white card, cased from a card given to me by Joanne Wragg
but I have changed the bottom half of the card by embossing and cutting the large scallop
and the addition of thinner ribbon than the original one had.
Stamp sets used : Flowers - Mixed Bunch and sentiment from Teeny Tiny Wishes.
Flowers punched using the Blossom punch.
Textured Impressions Delicate Designs embossing folder for the border
then die cut using the Large Scallop Edgelit.
Basic Rhinestone and Silver 1/8" ribbon embellishment.
Thanks for the inspiration Joanne.

Sunday, 15 June 2014

Carol's card

On Thursday, my crafting friend and SU downline, Carol, wanted to make a very special card
 for friends who had been very kind and considerate with her a couple of days earlier.
She browsed her very favourite website - can you guess?  Begins with P?
Anyhow - inspired by a card on there, she came up with this.


She has used the new In Colours which will be available from 1st July 
with the launch of the brand new Annual Catalogue.
I don't know if you can see the scored horizontal lines across the card.
The flowers wer stamped with the Petite Petals stampset 
and cut with the matching punch.
Think that I will be casing this myself!

Saturday, 14 June 2014

Dare I say the C word?

Last Wednesday one of the ladies asked if she could make Christmas cards, (which she did)
but I thought I had better get a few more done myself.  I had resolved to do at least 2 a month, so now I need to do at least 4 a month to get back on schedule - so here's the first for this month - I'll see how many I can get done.


Crumb Cake DSP is used for the base card - a thin strip of one of the new DSP stacks,
Silver and Gold Glimmer Paper and Mossy Meadow card stock was used 
with the Merry Minis punch pack for the trees, baubles and stars.
A Naturals Designer button is threaded with  Gold bakers twine
tied in a bow to finish it off.
This is a revamp of one of my up-line's cards Julie's  from a couple of years ago
So thanks for the inspiration Julie!  Appreciated!

Friday, 13 June 2014

Masking with Washi Tape technique and Blendabilities.

Last evening my friend and down-line Carol. stayed behind after the Thursday class
and we both had a play with a new technique, which featured in our
Stampin Up Impressions Newsletter (May/June 2014 )


We started off with a base card of Crumb Cake and used strips of Washi tape to form 
a diagonal striped mask.  We then sponged Whisper White ink onto the exposed Crumb Cake card.
Once dry we removed the washi tape, and you can see how effective this was.  We were most impressed!!
We used the Secret Garden Stamp set (retires this month eek!) for the flowers and leaves,
cut them out with the matching framelits
and then the fun began when we started colouring in!!
I have to confess this is my second attempt at these flowers, and I am quite pleased with them - 
but I know I still have far to go with using these fabulous alcohol pens!
I found it quite relaxing to colour in!
Anyhow - what do you think of this?  (Please be kind!)

Thursday, 12 June 2014

Serene Silhouettes

Here's another one of the "something old, something new" themed cards .


This is a cased version of a swap that I received (not sure when though)
the original was done by Michelle Last.
The old part is:- Crumb Cake card stock, stamp sets are :- Serene Silhouettes
 the script is a builder wheel stamp-Travel Journal and the sentiment is from Four You.
The new part is  Lost Lagoon card stock and inkpad.
I really love this card - thanks for the inspiration Michelle.

Wednesday, 11 June 2014

Sneak Peek -No-stamp card!

Here's a card that I made today whilst Chris was with me, it's a card that uses absolutely
no stamps at all!! It is simply card stock and the brand new MaritimeDesigner Series Paper.
(This paper does match the really fun stamp set that I used the other day - Sea Street.)

Card closed
Card open
Its a Z fold Square flip card - a White 6"x 6" base card is die cut into a flip card
 using the scalloped square die out of the Squares Collection Framelits.
The same die is used to cut the Night of Navy scalloped square.
The central panel is a selected square piece of DSP cut with a straight square die,
which is then layered onto a slightly larger square of real Red card stock.
The back of the card has a half size panel from another sheet of Maritime DSP.
I chose not to put a greeting on this card - it will come in handy for quite a few occasions,
and the sentiment inside can reflect the appropriate occasion.


Tuesday, 10 June 2014

Something old with something new!

Something old - the flourish from the Everything Eleanor stamp set
and the flowers from Flower Shop stamp set with the matching Pansy Punch.......
something new - the stampin' pads in the 2014-2016 In Colours:
Hello Honey and Mossy Meadow
and the matching Hello Honey card stock.
Put them together with a couple of sentiments from Petite Pairs
and a sprinkling of Gold Stampin' Glitter - and what do you get?


This little beauty!!
It's for someone special whose birthday is next month
- it could be you!!

Monday, 9 June 2014

Sneak peek Sea Street

Today I have had a play with one of the stamp sets that will be available with the launch
of the new Catalogue on July1st - Sea Street.
I have teamed up the stamp set with a sheet of the  Moonlight Designer Series Paper Stack.


I have used colours to match the DSP -
Lost Lagoon, Hello Honey and Basic Gray.
Think that this would make a lovely card for a child.
I love those tiny fishes and that cute crab!!
(Card cased from Stephanie Fuhrmann's blog - Here)

Sunday, 8 June 2014

My crafting day with Lexie.

Simon and Kerry had loads of jobs to do around the house and garden today, so Lucas went playing with his friends and Lexie and I have had a girlie day together.
We started off doing a bit of shopping, went home and Lexie baked some buns.
Here they are.......


Lexie used a packet mix, and complained of being short changed - there were only 11 bun cases in the box!
I bet you thought she had eaten one didn't you!


Here's a photo of the chef herself with her creations.
(Notice the missing teeth!  The tooth fairy called on Friday night and left her some money,
which she promptly spent yesterday - on loom bands!)

Speaking of loom Bands -
Lexie showed me how to make a "Fishtail" loom band bracelet after lunch.
She chose to have lunch at - yes you've guessed - McDonalds!
We sat outside and ate our lunch as the sun was shining.  Then we had an ice cream
and went back home.  Lexie then gave me a lesson on how to use the Loom
to make these bracelets.  Lexie herself, uses her fingers - but mine are too big!!
Anyhow, here's my first attempt at a fishtail loom band bracelet and I am quite proud of it!


I think I did really well - what do you think!

Saturday, 7 June 2014

Sneaky Peek Mossy Meadow - just for you!

Here's a really quick CAS card made using another of the stamps from the Work Of Art stamp set, this time using another of the new In-Colours - Mossy Meadow!


This photo really does not do justice to the lush rich green colour of Mossy Meadow,
I will try and take another photo when the light is better - it's just been so dull today.
Once again the stamp is inked once and then used several times without re-inking
to give this effect.
The hearts have been punched with one of the new Itty Bitty Accents punches,
ans simply embellished with Basic Rhinestones.

Friday, 6 June 2014

Blackberry Bliss ombre effect card.

Woopee!!
This afternoon my Stampin' Up! 2015 Catalogue Pre- Order arrived.
Unfortunately (no I don't mean that )it arrived just before I was due
to fetch the grandkids home from school, so I didn't even have time to unpack my order.
Although I did manage to open the box and take a quick peek.
Knew that I wouldn't get a chance to play proper until they were back home
so tried to forget it until the family went home after dinner.
Once we had waved be bye, I dashed into my craft room and unpacked all the gorgeous new goodies!!
Thought that I had died and gone to heaven.
The hardest thing was knowing what to play with first!
I plumped for the Work of Art stamp set and a new In-colour stamp pad -
Blackberry Bliss.  Up to now it's my favourite new colour.
I also used one of the new Itty Bitty Accents punches.
So without further ado....
Ta da!!


 I created an ombre effect by inking the stamp once and then stamping the image repeatedly
 without re-inking it. I punched the little shamrocks out of the Blackberry Bliss card stock
and the finishing touch was a basic Rhinestone for the centres.
Think that I will make this the design for my customers' thank you cards this month.

Thursday, 5 June 2014

Frugal Friday

I am now in the habit of trying to make cards from scraps that litter the desk after a crafting session -
 for this I blame Lizy Bartaby who started me off with this!!
You can see various samples of her Frugal Friday cards HERE
Tonight one of my Thursday ladies made a card that you can see
and these are the bits that were left on the desk when she had finished.


This reminded me of a card that one of my Tuesday ladies had made using the pieces 
that were left after using the Bigz Lattice die recently - I challenged Jean to make a card with the bits
and she made a masterpiece of a flower and a stunning card.
The one that I have made below was just a quick demo to my Thursday ladies
of how you can make a quick and easy card from the bits.
(I'll see if Jean still has her card and post it on here later if she has it!)
Meantime here's my quick and easy 3 minute special!!


I am quite pleased with this - although the photo isn't very good as the light is fading!
The daisy is made of Brushed Gold card (the punched pieces from the Lattice Die)
these are stuck onto a scrap of Black card, then this is stuck onto a small white base card.
The greeting is from "My Friens stamp set and is stamped in Versamark
and heat embossed with Gold Embossing Powder.
Thanks for your inspiration Jean, and your Frugal Friday Lizy!!


Tuesday, 3 June 2014

Sneak Peek - Fantasy Flowers

Hello everyone - today I have some fantasy flowers to show you -
punched (mainly) using the new In Colours card stock,
most of the parts are simply punched -
parts of these are made with the triangle punch - can you spot which bits?


The new colours are:
Lost Lagoon, Mossy Meadow, Blackberry Bliss, Hello Honey and Tangelo Twist.
I am quite pleased with how these have turned out.
What do you reckon?

Monday, 2 June 2014

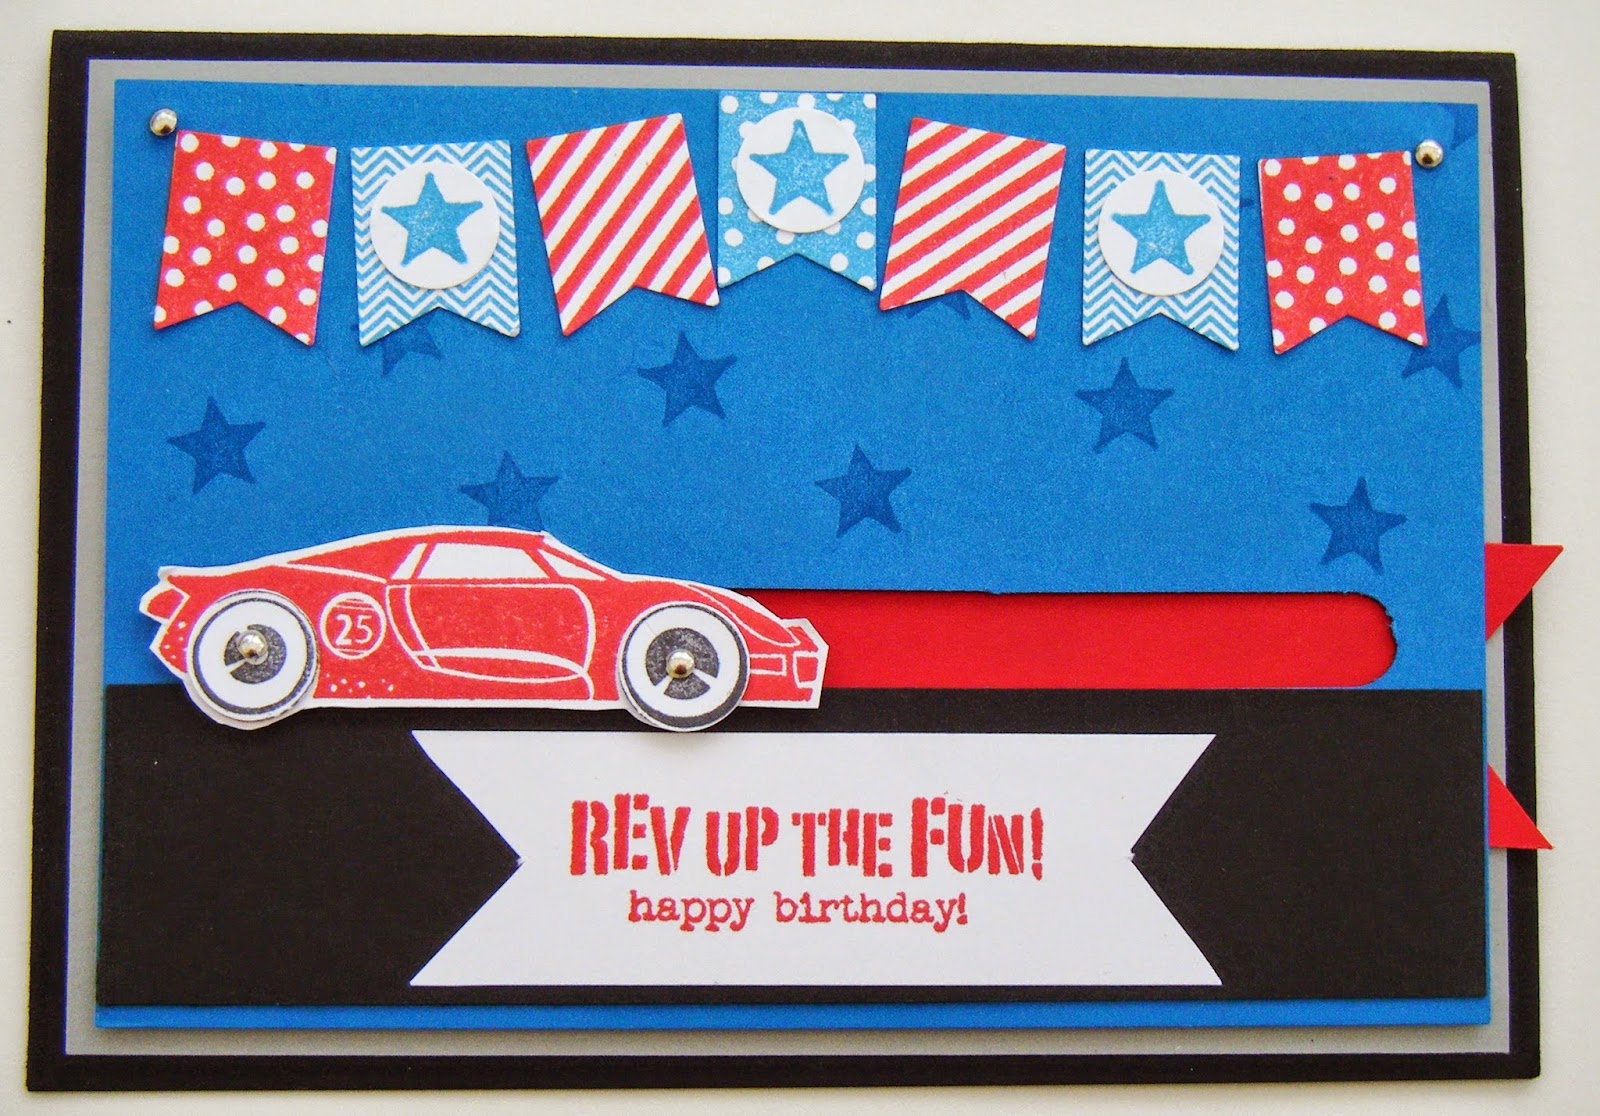
More Rev Up the Fun!!


Chris and I got together on a different day last week.  I went over on Friday (instead of our usual Wednesday get-together) We made a card together, then met up with Janice for a spot of lunch, then back to Chris's for pudding - and made another card!!
Her's the second card we made - once again cased from the lovely Jenni Moors blog.

Slider closed

Slider pulled open
         I have really enjoyed making these cards, and I have resisted buying this stamp set until now!
Believe it or not, but it is now on the Retirement list and the price is reduced,
and I have succumbed and ordered it - a month before the new catalogue launches!  
The colour combo is Pacific Point/ Real Red. Black, Smoky Slate and White.
Stamp sets used - Banner Blast (SAB) cut with matching Banner punch.
and of course Rev up the fun!
Really love this fun card - hope that you do too!

Sunday, 1 June 2014

Congratulations

Here is a card that I have made for my down-line Trisha, who promoted to Bronze 2
and achieved Stampin Start part 1 last month.
Didn't she do well - she only joined as a demonstrator at the end of February!
I have used my new toy - the Triangle punch to create this card,
but also have used 3 of the new In Colours that you will be able to have for yourselves
when the new catalogue launches next month, on 1st July.


The colour combo is -
Blackberry Bliss, Mossy Meadow and Lost Lagoon
(the new colours_ along with Perfect Plum and Wisteria Wonder.
Punches used are Triangle, Bird Builder and Itty Bitty Flower.
Sentiments from Happy Watercolour and Sweet Essentials.
Congratulations and Well Done Trisha - way to go!!