Friday, 23 May 2014

I Phone stepper card

Here's a card that I made, inspired by the lovely Amanda at The Craft Spa
At one of our Jems' training events, Amanda made us an I Phone for her card swap
(it was the all day training when we did all male themed items)
She gave us homework to do - we had to make the stepper card for
the I Phone to be "docked" onto.
Last night Carol and I had a go at making our own based on the instructions that Amanda gave us
 - you can find them by following the link above.

The phone

Front view of  phone "docked" with speakers

Side view of completed stepper card.
We really enjoyed making these - thanks Amanda!!


Thursday, 22 May 2014

Love and Sympathy

Needed a sympathy card to send to a friend whose uncle died this week, and due to pressures of time
(and golf) it had to be a quick card. At last nights craft class, I showed the ladies how to make the diamond stencil using the Triangle Punch and then how to arrange the diamonds in a pleasing order.
The card that I produced was ideal to make a sympathy card with.
Here it is.


Colour combo is Elegant Eggplant, Perfect Plum, Wisteria Wonder.
The stamp set for the sentiments is Love and Sympathy.
I am really pleased with this - hope that she takes comfort from it.

Wednesday, 21 May 2014

70th Birthday card

I needed a card in a hurry for a 70th birthday today,
I went to my box of cards for occasions (that I leave blank ready to add a greeting later)
and chose this one as I love the colours on it and knew that Rita would love it too.


I just added the scalloped circle , stamped with an Everything Eleanor stamp,
punched out the middle and die cut a 70 in Crisp Cantaloupe to pick out the colour 
from the (retired Sale-a-bration) DSP.
I added the sentiment from Teeny Tiny Wishes and voila 
- a card finished off literally in minutes - managed to get it sent yesterday afternoon,
so Rita will have received it today for her special celebration.
Happy 70th Birthday!!

Tuesday, 20 May 2014

Brother's Birthday.

Tomorrow is my brother Chris's birthday and here's the card I have made for him.
This is another card that I made at Chris's (sis-in-law) last week!
(Cased from Jenni Moors blog)


Another card using the Rev up the Fun stamp set - it's been really useful for men's cards.
Colour combo is Real Red, Pacific Point, Smoky Slate, Black and White.
Embossed the Smoky Slate card with the Chevron Textured Impressions Embossing folder.
Maggie and I are taking him out to lunch tomorrow, so it should be nice to have a little get together!
Happy Birthday Chris!

Monday, 19 May 2014

Template for stencilling diamonds

First of all I must apologise for not posting these instructions yesterday, as I said I would.
I do hope that you will forgive me, and still have a go at making the template and having a go at designing your own card using it.
Here we go then!
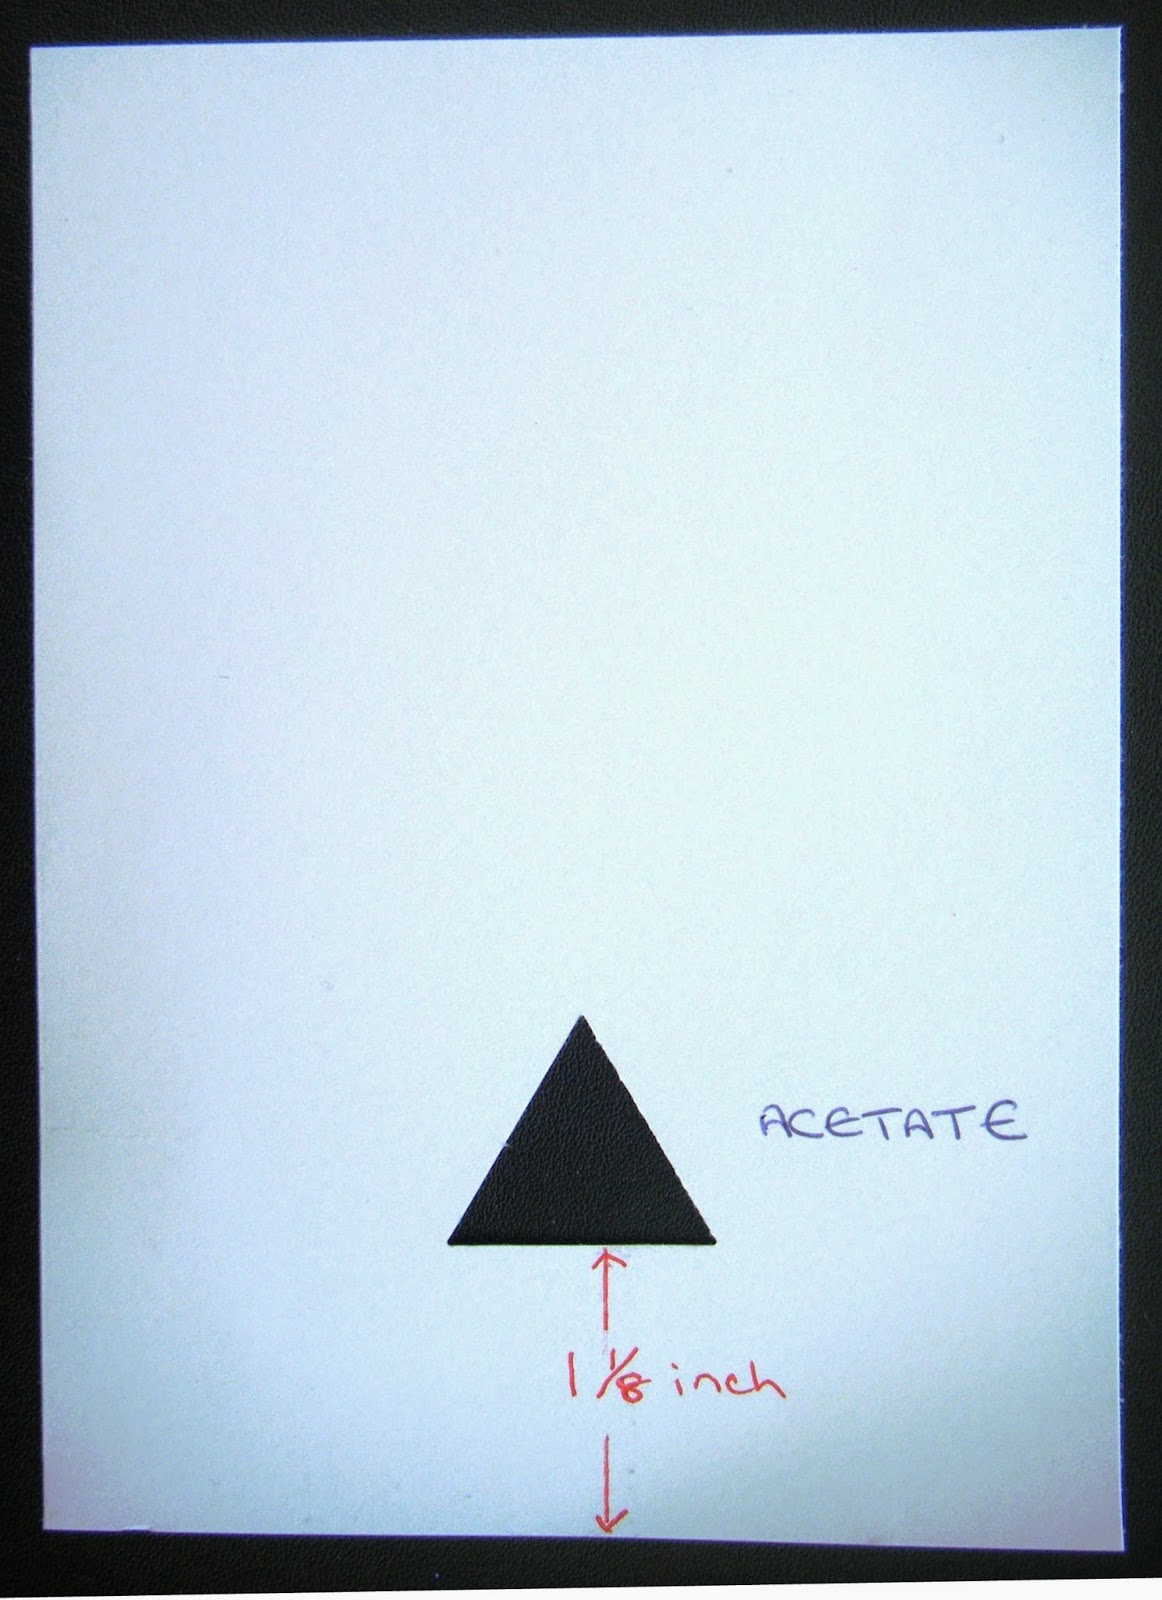
You need a piece of Window Sheet or a piece of a sheet of acetate- I used an A6 piece for mine
(approximately) and a Stampin' Up! Triangular punch (Item number133375 £14.25)
For these photos I have used White card on a black background so that you can see what's been done.

First of all, punch your triangle from the bottom of the narrow side of your acetate


 Check the measurement of how far up the acetate it punches - I measured it at 1.1/8 inches


Double this measurement i.e. 1.1/8 x 2 = 2.1/4" then cut the acetate at this depth
(Keep the spare piece of acetate to one side - you will use this to make your template a workable size.)


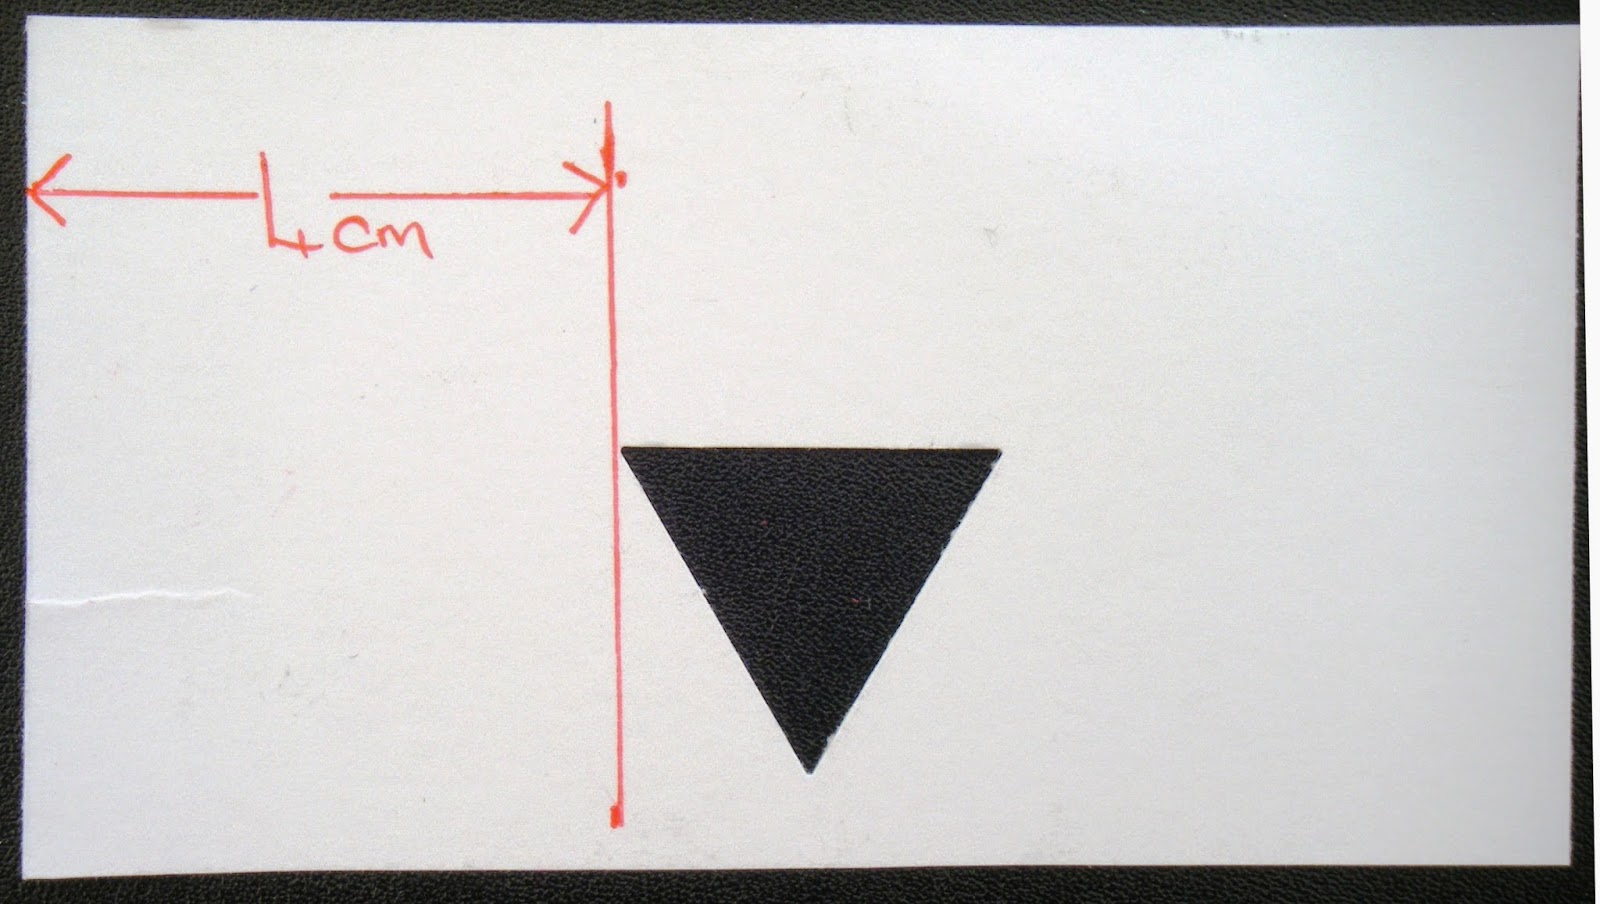
You will end up with a piece like this


Rotate this piece through 180 degrees (your triangle will now be upside down)
and measure the distance between the LH corner of the triangle and the side - mark a line at this distance.
This will be your visual guide as to where to place the triangle punch the second time.


If you have got it spot on (it took me about three goes to get it right!!)
you should then have your diamond shape punched out of the acetate.


Now retrieve your other piece of acetate and cut it in half.  
Place one piece above  and one piece below your punched diamond piece.
Sellotape them together as shown below.


Your finished stencil should look like this (I know its not very clear, but see next picture.)


Here I have sponged round the edge of the acetate and onto the cut out diamond
to make it show up a bit clearer.
I wrote "this side up" because I had stuck the sellotape on the reverse side of the acetate-
that way you can clean your stencil without damaging it.

And there you have it - a ready to go diamond shape stencil.
I would like someone to test out these instructions for me and let me know if they are clear enough,
or whether I have missed something out.
If you test this, could you email me and let me know?
katemartin@sky.com
Enjoy!!


Saturday, 17 May 2014

Telford Swaps

I have scheduled this post for you to view whilst I am having a fabulous time (no doubt)
at the Stampin' Up! Regional event at the International Centre Telford.
One of the things that takes place at these events is that the Demonstrators swap cards.
Here are the ones that I will be swapping.
(I have made 50 in total - a few of each design)
The colour combo of them all is
Baked brown Sugar. Coastal Cabana. Pistachio Pudding and Black.

Stamp sets : Summer Silhouettes, So Very Grateful and Petite Pairs

Stamp sets : Summer Silhouettes, Four You and Petite Pairs


Stamp sets : Summer Silhouettes, Simply Sketched and Petite Pairs

Stamp sets: Four You, The Open Sea and Clockworks.

Stamp sets : Summer Silhouettes, So Very Grateful and Petite Pairs

Stamp sets : Summer Silhouettes and Petite Pairs
Tomorrow I will post instructions on how I made the stencil for the Diamond shape,
 using the Triangle Punch - maybe you'd like to have a go yourself.

Friday, 16 May 2014

Lexie's altered notebook.

Lexie (my grand-daughter aged 7)  was at our house this afternoon after choir practice,
along with Lucas.  After she had had her tea she wanted to do some crafting,
but didn't have much time as she had to have her shower before going home.
We quickly got her showered and dried and she made this little altered notebook in record time!!.


Here's Lexie's little notebook - colour combo is Pool Party and Crisp Cantaloupe.
She picked her own colours, ribbon and "bumpy thing" that's Lexie speak for an embossing folder
and decided to put her initial on this rather than having a sentiment.


Here's the little notebook that inspired Lexie to have a go herself -
I received this as a swap at a Training event earlier this year, but it hasn't got any details on it
so I can't give credit to the designer.
If you recognise this - please let me know and I will  put a mention on here.
Well done Lexie - you have done a lovely job!


Thursday, 15 May 2014

Telford Event

Well I am getting rather excited now.
On Saturday it is our Stampin' Up! Regional Event at The International Centre, Telford.
A few hundred Stampin' Up! Demonstrators will be there to have a fabulous day together.
We will be shown some sneak peeks of the upcoming catalogue which launches 1st July!
We will be doing make and takes, updated on what's happening - and of course we will be  swapping!!
We all have to make a name badge - as well as making swaps.
My swaps are almost complete, but I won't show you them until Saturday,
meantime- here's my name badge


Colour combo is Baked Brown Sugar, Coastal Cabana, Pistachio pudding
on White card using Black Ink.
The diamonds are sponged through my home-made diamond stencil,
which, you may recall, was cut using the triangle punch.
The stamp set used was Summer Silhouettes,
Basic Rhinestones form the flower centres and I have put a dusting of 
Dazzling diamond glitter on the other flowers,
but I am not sure that it shows up on this picture.
and my name was computer generated.
Carol, Amanda and I will be travelling down to Telford together, (Carol has volunteered to drive 
so it will be nice and relaxing for me), setting off in the afternoon,
so that we are all refreshed and raring to go Saturday morning bright and early!
Can't wait - Yippeee!!

Wednesday, 14 May 2014

Ethan's birthday

I have made three birthday cards for people celebrating their birthday tomorrow.
I can't show two of the cards I have done as they are in the post and the recipients won't get them 
until the morning.  This one however I can show you, as it's for my Great Nephew, Ethan, who is in Lanzarote this week, so he won't get his card until he gets home next week.
I made this at Chris's and it's cased from Jenny Moors blog)


Colour combo is Smoky Slate, Basic Grey, Pacific Point, Real Red.and White.
The stamp set is Rev Up the Fun- which I thing is a super set for boys and men.
The little pennant is stamped using Banner Blast and punched with the matching punch.
Think that he will like this (but will appreciate the money inside it even more!!)

Tuesday, 13 May 2014

Tall Skinny CAS Birthday

This is what I describe as a tall skinny card -
it's A5 folded lengthways - hence it's tall and skinny.
I am really into CAS at the moment and you can't get much more Clean and simple than this!!


It's simply three panels of Night of Navy DSP cut from the Regals DSP Stack.
These are layered onto a mat of White card stock,
These three panels are raised on dimensionals
and the greeting (from Teeny Tiny Wishes) is stamped between the panel (using a Stamp-a-ma-jig).
The Little Leaves Sizzlit die was used to cut the leaf sprigs.
There you have it - CAS Tall Skinny birthday card!!

Monday, 12 May 2014

WWWU#17

It's that time of the week again - Wades Weekly Warm Up#17
I can't believe that we have done this Challenge for 17 weeks!!
Here's my offering for this week.
A very CAS card, but so pretty I think!
(Cased with permission from Liz Bartaby)


The colour combo this week is :
Calypso Coral, Crisp Cantaloupe, Chocolate Chip and Old Olive.
I have used DSP from the In Colour DSP Stack (Crisp Cantaloupe)
with Crisp Cantaloupe Riffle Stretch Trim,
Little Leaves Sizzlit used to cut leaves in Old Olive CS.
2 Coral Calypso flowers, cut using Petiite Petals punch and layered on top 
of each other after shaping.
Flower centre is a 1/4" circle punched in Chocolate Chip CS then shaped.
The sentiment is from Teeny Tiny Wishes.
Love this colour combo Julie!!

Saturday, 10 May 2014

Frugal Friday #2 Challenge

I am really enjoying these Frugal Friday Challenges, and if you would like to know more,
or even join in, you will find Lizy's challenge HERE.

Basically, you take a pile of scraps from your desk and make something with them.
Here's what I made today with some of yesterdays scraps.


The colour combo was Real Red and White with a hint of Silver Glimmer.
Here's the pile of scraps that I used.


The piece of Fresh Prints DSP that was a left over, wasn't big enough to use as the central mat,
on this card, so I pieced it together with a scrap of White which I embossed with
the Textured Impressions Delicate Designs embossing folder
 (it looks like a patchwork quilt on the back of this layer!).
I punched an Extra Large Oval out of this piece of DSP before I layered it onto a piece of Whisper White card stock from my scrap box (it had a dirty mark in the middle) which I had gutted and used the
reverse side of the middle piece for the Oval Designer frame which was embossed and then fussy cut out.
The extra large oval piece of DSP was then glued into the oval frame.
I shaped the punched Petite Petal flowers and punched and shaped 1/4" circles for the flower centres,
and cut leaves out (with the Bird Builder Punch) from the scraps of Silver Glimmer Paper.
The sentiment from Teeny Tiny Wishes was stamped then punched with the Word Window punch. 
This was then stuck onto a piece of Real Red (which was punched from the piece of
card stock used for the first layer) using the Modern Label punch.
This was a really Frugal Friday card!!
I did use a completely new white base card - otherwise the other bits were all left overs.

I would like to enter this into

Friday, 9 May 2014

Variation on a theme

Here's a card that Chris made when she came and crafted with me on Wednesday.
It's a variation of this version that I posted earlier.


The car and sentiment are from the Rev Up The Fun stampset
and the banners from the  Hearts a Flutter stamp set and matching  Framelits dies.
The colour combo is Silver, Pacific Point, Smoky Slate, White and Black.
The button and ribbon are both retired items, but we thought it matched well.
All products are Stampin' Up!.
We are making good use of this stamp set - it goes back to it's owner on Tuesday!!
(Thanks for the loan of it Liz G)

Wednesday, 7 May 2014

Blooming with Kindness

I am currently trying to use stamps that have not been used recently, so today,
 when Chris (sis-in-law) came over to craft, we turned to Blooming with Kindness.
I took inspiration fro the layout from a post on Pinterest, 
but changed the papers and the scallop border.
I have not put a sentiment on at this point, but will place one top right
when I decide who will receive it and for what occasion!!


Colour combo Midnight Muse and White.
Stamp set Blooming with Kindness.
Scallop border embossed using Textured Impressions Delicate Designs embossing folder, 
then cut with the Large Scallop Edgelit.
Midnight Muse 3/8 inch Stitched Satin Ribbon. used to make a knot-less bow
(using a pearl brad from my stash)

Tuesday, 6 May 2014

WWWU#16

It's that time of week again - Wade's weekly Warm Up
and this week the colour combo is
Raspberry Ripple, Pool Party and Strawberry Slush.
Here's my card.


I punched one triangle with Raspberry Ripple, two triangles with Pool Party,
the three triangles with Strawberry Slush card stock (using the Triangle punch - if you didn't guess!)
and glued them onto a 10 cm square base card in a pyramid shape.
I then stamped the Petite Petals flowers in Strawberry Slush and Pool Party ,
and cut with the matching punch, then glued them in the white triangular spaces.
A 1/4" punched white circle was then shaped and glued in the flower centres.
Leaves were added, cut with the Bird Builder punch.
I've used the (retired) Just Because sentiment as I am trying to do cards
 that will suit many occasions and I think this one fits the bill perfectly.
Mmmm - I like this one - thanks for the colour combo Julie!!

Monday, 5 May 2014

Just Because.........

Sometimes it's nice to send a card to a friend just because...... for any number of reasons.
So I do like to have a few of these cards that will fit the bill if I don't have a specific occasion card.
This little card was made from scraps left on my desk before I tidied up today,
and this design just asked to be made up!


It's a  10 cm square base card with a colour combo is Strawberry Slush, Silver and White.
Made quite simply from 4 scraps of Strawberry Slush DSP from the In Colour 2013-2015 Collection
a stamped and punched Petite Petal flower,
and a couple of reject silver leaves punched with the Bird Builder punch.
(rejected as the stems weren't long enough for the project - they are fine for this one!!)
The sentiment is a retired stamp that I won't part with as its so useful.
All products are Stampin' Up!

I have just realised I should have taken a photo of the scraps first - as it's too late for that
here is a piccie of what was left after!!


I would like to enter this in

Sunday, 4 May 2014

Rita's Birthday

Tomorrow it is my cousin Rita's birthday - she is Linda's sister,
 so as long as I remember Linda's birthday, I don't forget Ritas!!
Here's the card I made for her using the Beautifully Baroque stamp again.


Colour combination is Smoky Slate, Crushed Curry, and White.
The papers are Eastern Elegance DSP.
Sentiment from Teeny Tiny Wishes stamped then punched with the Word Window punch, 
and layered onto a piece of Crushed Curry cardstock cut with the Modern Label Punch.
The grey pearls are from my stash - everything else is Stampin' Up!
I can safely post this today as Rita doesn't blog either!!
Happy Birthday!


Saturday, 3 May 2014

Linda's Birthday

Tomorrow is my cousin Linda's birthday,
here's the card I have made for her.


The colour combo is Pistachio Pudding. Gold and White
A Window Framelit aperture was cut out of the front of a White square card base.
Then the lattice frame was cut using the Lattice Bigz die and stuck on the four points
of the aperture.  A piece of Pistachio Pudding card stock was stuck behind this.
The flowers were stamped using Petite Petals stamp set with Versamark
and heat embossed with gold embossing powder, then punched out with the matching punch.

The leaves were cut using the bird builder punch with gold foil card and the flower centres were 
punched 1/4" circles shaped with an embossing/scorer shaping tool.
The sentiment is from Petite Pairs.
I am really pleased with the finished article!! Think that Linda will be too.
(I am quite safe in posting this today - Linda doesn't blog!)

Friday, 2 May 2014

Beautifully Baroque Christmas

Here's the second one of the cards that I made at Chris's on Wednesday
using the fabulous Beautifully Baroque stamp - this time a Christmas card.


It's a 7 x 5 inch card (just to give you some idea of the size of the stamp).
Colour Combo is Night of Navy, Silver and White.
The flourish from Everything Eleanor was stamped in Versamark,
then heat embossed with Silver Embossing powder.
The entire stamp was then stamped onto the card using Versamark and heat embossed in Silver EP,  
plus a further image was made in the same way on a separate piece of Whisper White card stock,
then the central section (the Bauble shape edged in blue) was fussy cut out.
Highlights of Night of Navy were added to this to make the bauble "pop" off the card,
then it was stuck on top of the original stamping with dimensionals to raise it.
A 1/4" Night of Navy Grosgrain ribbon bow was added to the top of the bauble.
There you have it - another Christmas card made.
(only another 73 to make!!)

I would like to enter this in
Completely Christmas - Challenge#10. - Anything goes


Thursday, 1 May 2014

Beautifully Baroque

Had a very productive few hours yesterday at Chris's (sis-in-law)
We made a few cards using the Beautifully Baroque stamp and I'll show you them all over the next week.
(It will make a change from Hardwood!!)
Here's the first one.


As this stamp is so decorative it's not necessary to add much else in the way of embellishments.
Just used a small slice of  Eastern Elegance DSP and a length of Coastal Cabana 3/8"Ruffle stretch trim.,
A sprinkling of Basic Rhinestones and voila!
This card is now ready for personalising with a sentiment when I decide who it will be going to!!
The sentiment will go in the top right corner I think.