Sunday 30 September 2012

Ann's Birthday

Today it is my golfing friend Ann's birthday.
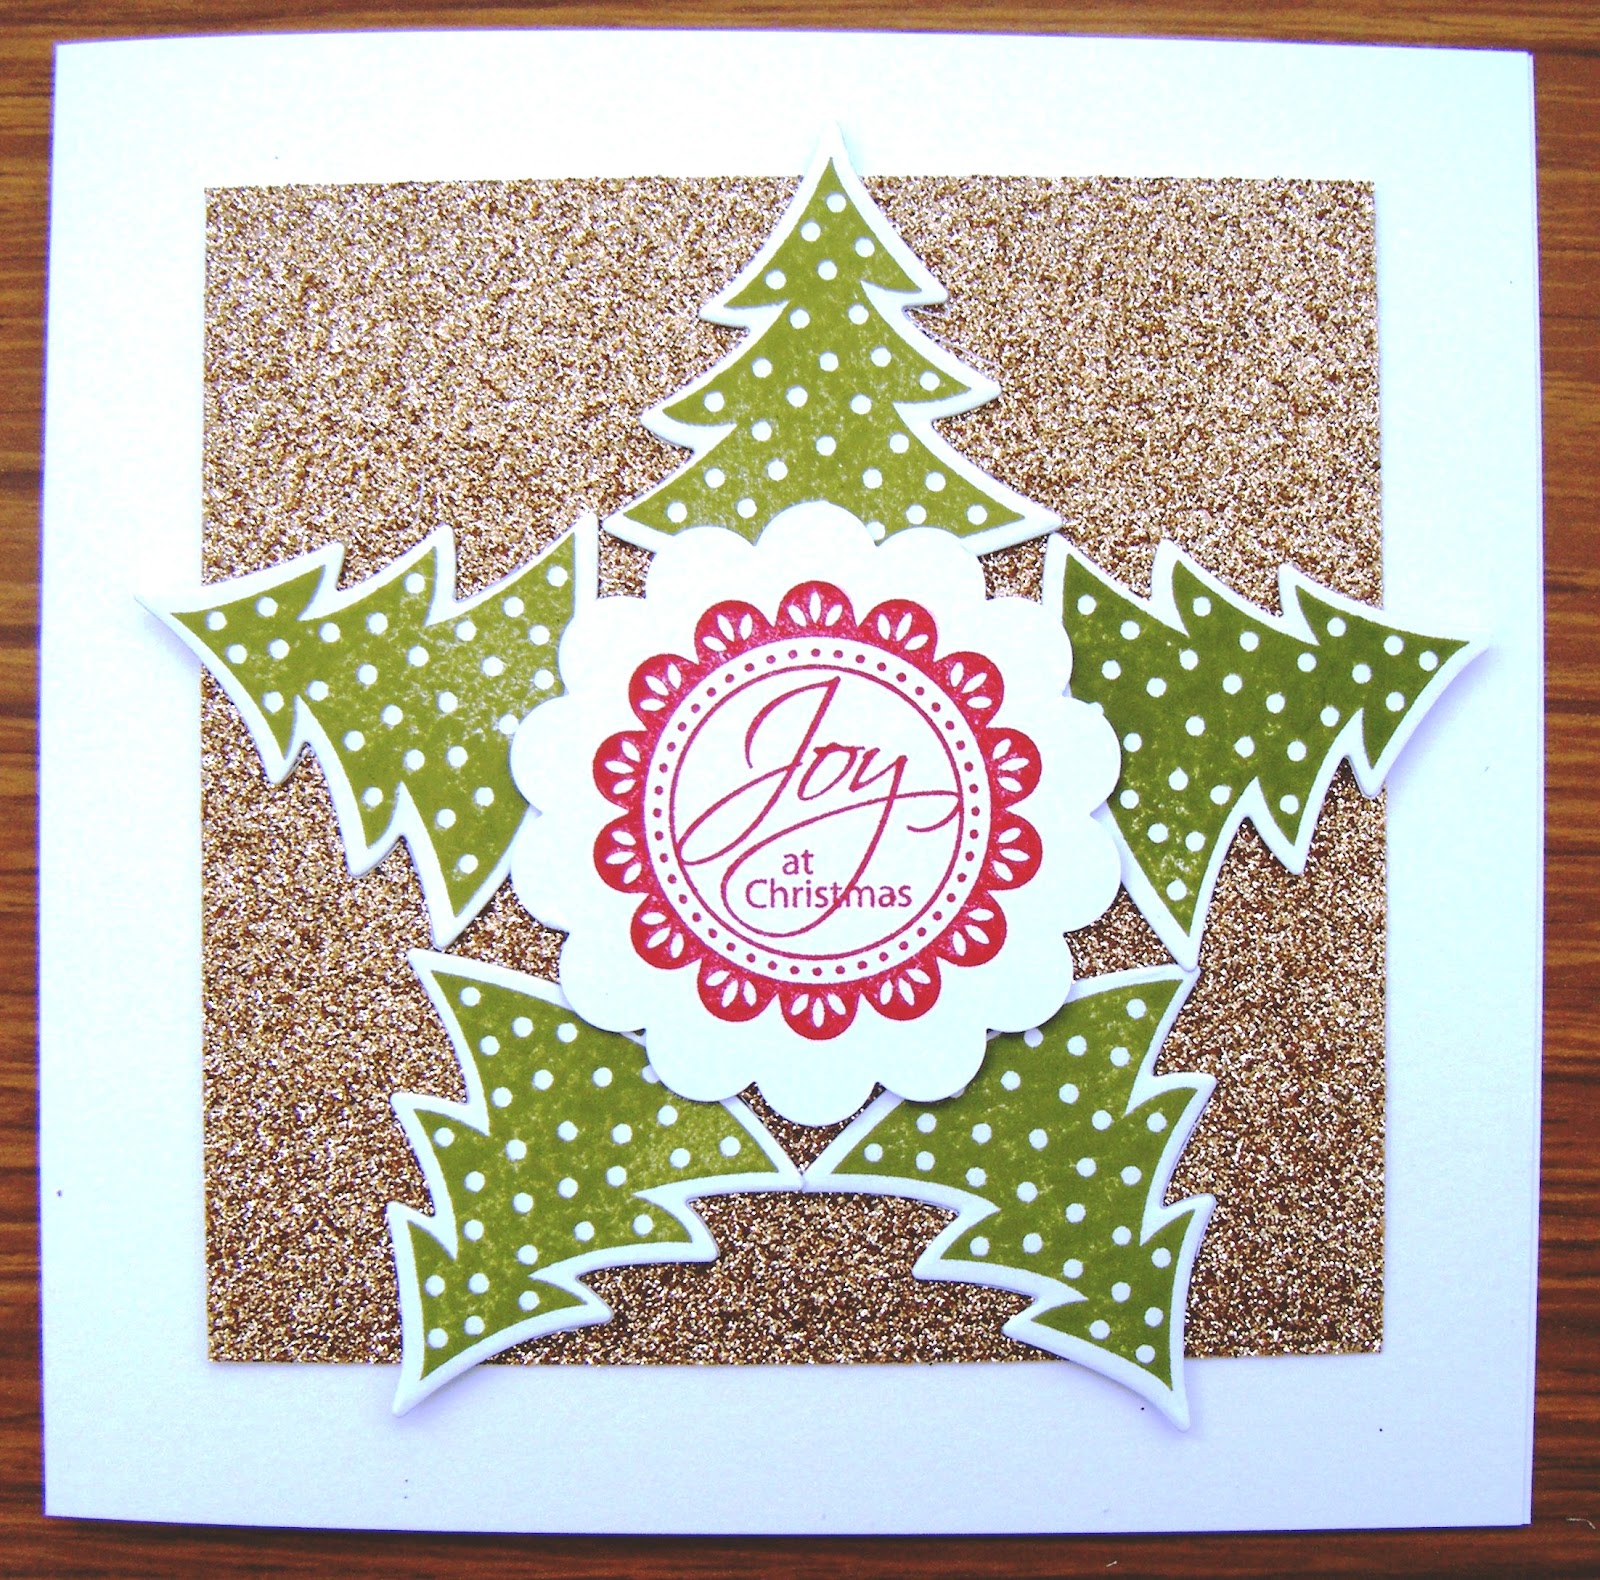
Here's the card that I made for her.


Happy Birthday Ann!!
Have a great day.

Saturday 29 September 2012

Happy Birthday Jackie

Today it's my dear friend Jackie's Birthday.


Colour combo here is Wisteria Wonder, Basic Black and Whisper White.
Stamp set used My Friend 
Background is Wisteria Wonder stamped with the silhouette.
The moon is created by cutting a circle stencil and then painting with bleach.
Cloudy sky created by ink dusting with Night of Navy,
Image matted and layered first onto whisper White, then onto  In Colour Paper Stack DSP,
then onto a base card of Whisper White.
Have a great day Jackie!!

Friday 28 September 2012

Twinchie Challenge#6 2nd entry

Here's my second Twinchie for the latest challenge which is to add a stamped image.


I have heat embossed this image from the You are Loved stamp set in gold EP on Very Vanilla card stock..
I have used a Brown 2" Slide frame to make a feature of the stamped image.
I added one strip of gold paper (cut from Mocha Morning DSP)
at both the top and the bottom of the frame.
I then punched 2 Champagne Glimmer paper flowers with the Itty Bitty flower punch
and added these at the top and bottom corners,
and then for the flower centres used tiny Basic Pearls to finish it off.

I would like to enter this into
Show us your Twinchies Challenge~6 - Add a Stamped Image

Thursday 27 September 2012

September Thank You cards

Here are some of the cards that I give to my customers who have ordered during the month.
I have used the new In Colour inks on all these cards.
The leaves are all inked in Gumball Green.

Primrose Petals                         Midnight Muse

Summer Starfruit                      Raspberry Ripple
PS the centre panels are all Twinchies!!

Wednesday 26 September 2012

Happy Birthday Janet

Here is the birthday card that I have made for one of my crafting ladies - Janet - whose birthday is today.


Colour Combo is Regal Rose, Basic Gray and Basic Black.
The oval is embossed using the Textured Impressions Designer Frames EF.
The sentiment is from Petite Pairs, stamped in Black on RR CS 
and then punched out with the Extra Large Oval punch.
I stamped the flourish from Vintage Vogue onto the gray panel (using the stamp-a-ma-jig).
The Pink scalloped and grey scalloped panels were cut using the Adorning Accents Edgelits.
I used Basic Gray 1/2" Striped Satin ribbon tied with some embroidery thread
to make the knot-less bow. I love this new ribbon - it's so chic!!
Have a great day Janet!!

Tuesday 25 September 2012

Christmas Door Wreath


This is a card that I have shamelessly cased from   Julie - a fellow Jem
To make the wreath I punched a  1.3/4" circle into a piece of Old Olive cardstock,
the punched a 2.3/8" scalloped circle around it .
The leaves were punched on Old Olive CS using the Bird Builder punch.
The flowers were punched using the Itty Bitty flower punch.
The door was made from Crumb Cake card stock, embossed with the Stripes embossing folder.
I then used Tea Stain Distressing ink and a blender pen with Early Espresso ink
 to make the door look more like wood.
The door handle was cut with a 1/2" circle punch and shaped.
The sentiment is from Teeny Tiny Wishes.
I tore Whisper White card to make the fallen snow at the bottom of the door.
Think that I will add some Dazzling Diamonds glitter to make it glisten.
A tiny bow at the top of the wreath and some red gems from my stash finished it off.
Hope you like it - I love it!!


Monday 24 September 2012

Happy Birthday Linda

Today it's the birthday of a fellow Crafty Blogger - Linda Simpson.
This is the card that I have made for her.


The colour combo is Old Olive, Baja Breeze with a touch of Night of Navy and Black.
The stamp set is Forever Young - how apt Linda!!
The sentiment is from Petite Pairs.
Sorry that I didn't manage to get this in the post on Saturday Linda,
but it is in the post and you should have it tomorrow.
Have a great day!!

Sunday 23 September 2012

Kraft Christmas bag


My friend Lyn gave me some of these Kraft Paper gift bags a few weeks ago
 and I have been saving them awaiting inspiration.
When the new 1.1/4" scallop circle and the Merry Minis Punches arrived with the 
Seasonal Autumn/Winter catalogue, the opportunity arrived to have a play!
I used scraps of retired Christmas paper and using a colour combo of
Early Espresso, Old Olive, Very Vanilla and Cherry Cobbler, I punched out 
scallop circles and 3/4" circles, then assembled them in a Christmas tree shape.
I punched out some of the Merry Minis in Champagne Glimmer paper to add a bit
of Christmas sparkle to the tree. I then added a tree trunk by embossing
Early Espresso Core-dination card in the Woodgrain Textured Impressions embossing folder.
Thanks Lyn!

I would like to enter this in
Pixies Crafty Workshop Challenge 39
Pixies Snippet Challenge
http://pixiescraftyworkshop.blogspot.co.uk/2012/09/pixies-crafty-workshop-challenge-39.html

Saturday 22 September 2012

French Foliage Thank you


Needed to make a thank you card today and had seen something similar to this on Pinterest.
I used French Foliage, En Francais. and Curly Cute stamp sets.
I stamped the leaves in Versamark and heat embossed with clear EP.
Then I lightly sponged on top with Primrose Petals ink. (It doesn't show up very well on the picture)
 I then over-stamped using the En Francais stamp with black ink.
I matted this onto a square of Primrose Petals card stock.
I then stamped the three feature leaves in Soft Suede, Chocolate Chip and Early Espresso.
The Modern Label punch was extended to mat the greeting on.

Friday 21 September 2012

Owl Occasions

Sue asked for two quick childrens' cards for her class yesterday, so I came up with this,
using the Owl Occasions stamp set.


I cut the Very Vanilla frame out using the Oval Accent Bigz clear die
I matted this onto Midnight Muse cardstock, then layered onto a Very Vanilla base card.
I stamped the branch in Chocolate Chip, then used the Stamp-a-ma-jig to position the owl
onto the branch. The party banner was inked using Stampin Write markers in various colours.
The hat was stamped in Cherry Cobbler and again positioned using the Stamp-a-ma-jig.
The greeting is from Curly Cute.
Sue loved the design! 

Thursday 20 September 2012

You are loved Twinchie


This stamp from You are Loved just fitted nicely onto the regulation 2" square, so I went with it.  
I inked the stamp up with Stampin Write markers using Cherry Cobbler and Old Olive ink.
I used the sentiment from Tiny Tags and the 3 tiny red pearls are from my stash.
This was then matted onto a Cherry Cobbler card stock square.

I would like to enter this into 
Show us your Twinchies Challenge #6 - Add a stamped image.

Wednesday 19 September 2012

Live, Laugh, Love.


This is another wall hanging that I have made based on Sally-Jo's original idea.
The base cards are cut with the Top Note Die and the background stamp is from Creative Elements.
The heart and flowers are from the You are Loved stamp set which will be making a come-back
 in the Annual Catalogue on 1st October - Hurray - I love this set!
The flowers were stamped in Cherry Cobbler ink.
The heart was stamped in Whisper white onto Cherry Cobbler card stock  
and heat embossed with White EP, then cut out by hand.  
The butterflies are cut out ods Cherry Cobbler card stock using the Beautiful Wings Embosslits die.
The little hearts were punched using the Small Heart punch and raised on dimentionals.
The word were stamped in Cherry Cobbler ink on Whisper White using the Letter It stampset.
I used some Cherry coloured thin ribbon from my stash to fasten the 3 pieces together.
(Another one that I will keep for myself!!!)

Tuesday 18 September 2012

Thinking of you

Heard some sad news today about one of our ex work colleagues, Vicky, whose father passed away yesterday.  Made this very clean and simple card to let her know that I am thinking of her.


I have used  a new Die (that you will be able to buy in October) to cut a fancy oval
stencil, then ink dusted it with Cajun Craze, onto a Very Vanilla 7"x 5" base card.
I then inked up the branch stamp from Hopeful Thoughts, using Early espresso  and
Cajun Craze Stampin Write markers.
I added the sentment from the same stampset.
Don't want to add anything else to this - I think it says everything. 


Monday 17 September 2012

Another Ornament Keepsake.

Version 1

Version 2

Here is a simplified version of the Ornament keepsake - it is useful if you don't have the stamp set and only have the dies.
For Version 1 - I cut 18 of these framelit  dies and folded 12 of them in half.  I then stuck 2 folded ones onto each flat one - thus making 6 baubles. I applied dazzling diamonds glitter to each edge of the bauble. Then I stamped a 3/4"strip of whisper white using the Good Cheer Wheel and scored it to make a medallion/lollipop- whichever you prefer to call it. I die-cut the two larger snowflakes, applied diamond dust to these ,then stuck one underneath and one on top of the lollipop.For the centre of the lollipop I cut a blue Boho Blossom flower and stuck a flat backed pearl in the middle.
For Version 2 I simply added some Organdy Ribbon in the spaces in between the baubles.
I think it just finishes it off nicely.

Sunday 16 September 2012

Cheerful Treat Tri-shutter card

Card part open

Card fully open

Card closed
This is one of the projects that I made for my monthly Saturday morning workshop.
I chose three more labour intensive proijects this month-
the other two can be seen HERE and HERE
This tri-shutter card is made using the soon to retire Cheerful treat Designer series Paper.
The base card is Melon Mambo teamed up with Lucky Limeade, Concord Crush and WhisperWhite.
The centre panels each have a Labels Collection Framelet die cut.
The Swirl and the leaves were cut  in Concord crush using the Swirls Scribbles Sizzlet die
 and the Bird Builder punch with Concord Crush card.  The flower is built with the Blossom punch
and the Modern Label punch with the centre being built with the Boho Blossom punch
and the Itty Bitty Flower punch - finished off with a tiny pearl

Saturday 15 September 2012

Snowflake Cheer


After yesterday's mammoth crafting feat, I needed something more relaxing this afternoon.
(I had my monthly Saturday morning workshop today so didn't get round to crafting for me
until about 3.00 p.m.- and needed to unwind)
The Colour combo on this card is Early Espresso, Very Vanilla and Gold.
I used the builder wheels Snowflake Party and Good Cheer to roller the greeting strips on Very Vanilla 
card stock and stuck these onto the Early Espresso, which was matted onto the base card..
I then used the Snowflake Flurry Die to cut the two smaller snowflakes, which were then stuck together. 
For the snowflake centre I punched a Boho Blossom Flower in Champagne Shimmer Paper,
which I fastened through the centre and through the snowflake and through the layer of Early Espresso - which kept the brads legs tidy and hidden between this and the base card.
Quite relaxing this card!!
Enjoy!

Friday 14 September 2012

Ornament Keepsake


Well I have spent all afternoon making this Ornament keepsake!
I have loved every minute and think that it is well worth the effort.
The Ornament Keepsake Bundle (Stampset and  matching Holiday Framelits Dies)
were not available on pre-order, so I had to wait until 1st September to purchase this set.
I decided to make mine with a colour combo of Gumball Green, Primrose Petals and Very Vanilla.
I stamped 20 of the Gumball Green baubles and 20 of the Primrose Petals ones.
These were then laboriously die cut, then folded in half and built up to make the individual baubles.
The edges of the baubles were glittered, but you hve to zoom in to be able to see this!
Pieces of Scalloped Tulle Ribbon were scrunched up and glued between the green baubles
before the primrose ones were glued on top.  A "lollipop" was then scored and folded , then glued on top.
Finished off with a "crystal button and some Bakers twine to hang it up with!!

Thursday 13 September 2012

A special birthday card


Sue - one of my Thursday crafting ladies, wants to make a card for a special friend tonight,
 so I thought that they could make this one - I think that this is suitable.
The colour combo is Basic Grey, Regal Rose and Silver.
The RR card stock is cut using the Top Note Die, then stamped in Versamark with the flourish
 from Everything Eleanor, then heat embossed with Silver EP.
The flower is die cut using the Fun Flowers die  with two flowers in RR and two in BG. 
 These are spritzed with water, crumpled,
then fastened together with a Vintage Brad, then left to dry before attaching to the card.
The Lacy Ribbon border is punched with RR card stock,
Siver 1" circles are punched and fixed to the back of the lacy border with Silver Brads.
The happy birthday (which has been stamped in Versamark using the sentiment
 from Party this Way is heat embossed with melon Mambo EP on BG card. 
 This is then punched out using the Word Window punch
and glued on top of a punched Silver Scallop Oval.
Phew!!!
Hope she likes it!

I would like to enter this in
The Cupboard Trilogy Challenge #3 Tic Tac Toe
(Bright Colours, Flowers and Ribbon)
http://thecupboardtrilogychallenges.blogspot.co.uk/2012/09/challenge-3-tic-tac-toe.html


Wednesday 12 September 2012

Perfectly Preserved


This is a card that we made at our Monthly Training with our SU mum Julie this month.
It uses quite a few things from the new Autumn/Winter Seasonal Catalogue and I have given you a
 sneak preview of a few items from the upcoming 2012-2013 Catalogue launching on the 1st October!
The stamp set is Perfectly Preserved and the jar, pear and lid have all been stamped, 
then die cut using the Cannery Set of Framelits Dies.
The papers are from the Orchard Harvest Designer Series Paper.
The Brushed  Bronze Designer Button is threaded with Linen thread,
which is also wrapped around the jar lid.
So I think you can now guess which items are from the new catalogue!!
Thanks to Julie  for giving us the opportunity to showcase this stamp set.


Tuesday 11 September 2012

Joyous Celebrations


Been playing with another new stamp set today (after class of course) it's the Joyous Celebrations set and I have teamed the oval and the Joy stamp with the Textured Expressions Holiday Frame Embossing Folder.
Very clean and simple lines - just two colours - Cherry Cobbler and Whisper White.
No bling added - just a knotless bow in Cherry Cobbler Seam Binding with White Baker's Twine.
Think that I haven't quite got that oval straight - but I'm sure that you get the idea!

Monday 10 September 2012

2nd entry Show us your Twinchie Challenge #5


Here's another Autumn wreath Twinchie - I used the same colours for the leaves as yesterday,
 but this time put it on a background of Early Espresso Core'dinations card stock 
that has been embossed with the Woodgrain Textured Impressions Embossing Folder - thought it looked like the wreath was hanging on a tree (or it could be a rustic door!!)
(both these items are now available in the Autumn/Winter Seasonal Catalogue)
The sentiment is again from Tiny Tags and punched with the Word Window punch then shortened.
Finished it off with a little bling - tiny Basic Pearls.

I would like to enter this into
Show us your twinchies Challenge #5 - Autumn

Sunday 9 September 2012

Twinchies Challenge #5


Well I hadn't done a Twinchie for the latest challenge, so I thought I would rectify that now.
These beautiful tiny autumn leaves have been punched  out using various Autumn colours, Soft Suede, Chocolate Chip, Poppy Parade, More Mustard,  Early Espresso, Peach Parfait , Always Artichoke.
I cut a circle of Lucky Limeade to make the back of the wreath and layered it onto
a 2" square of Crumb Cake.  The sentiment is from Tiny tags.

I would like to enter this into the
Show us your Twinchies Challenge #5 - Autumn

Saturday 8 September 2012

Autumn Leaves


I decided that I needed a break from Christmas projects and thought instead I would look to the Autumnal theme.  I decided to make another shadow box card, and made a faded rose on a heap
of various Autumn coloured leaves.  I did pop a few gold leaves in, but they don't show up on the photos.
I used the Blossom punch to make the rose, with a Vintage brad in the centre 
and the Sizzix Originals Leaves #2 die for the leaves.

 I would like to enter this into the LEJ Designs Challenge No 19 - Autumnal

Friday 7 September 2012

Snowflake Scentsationals!!


Another card using the last of the stamps from the Scentsational Season set,
 this time the snowflake mug was die cut with the Framelits Holiday Collection,
 layered on top of Night of Navy mat on a White base card,
 with a Bigz Snow Flurry diecut snowflake on top.
Embellished with tiny Basic Rhinestones and the sentiment is from teeny Tiny Wishes.

Thursday 6 September 2012

Dale's Birthday


It's my baby sister's partner's Birthday on Saturday, so today I have made this card for him.
I used the Timber wheel to get the texture on the tree trunk,
 rollering with a combination of Chocolate Chip and Early Espresso ink.
The owl is punched using the Owl Builder punch ,
 Dale is stamped using the Letter It stamp set in Midnight Muse.
The sentiment is from Teeny Tiny Wishes.

Wednesday 5 September 2012

Ann's Birthday

Yesterday was one of my crafting friends - Ann's birthday.
Here is the card that I nade for her.

Yet more Scentsational Season


A little row of gingerbread people have come to wish you a Merry Christmas!!
Same stamp set with the Holiday Collection Framelits makes this a quick and easy card.
The backround paper is some retired paper that I have that I thought went with this design so well.
Colour combo is Early Espresso, Cherry Cobbler and Whisper White.
The greeting is computer generated.

Tuesday 4 September 2012

Scentsational Season Candy Canes


I have been playing with the Scentsational Season stamp set with the Holiday Framelits dies
and come up with this candy cane wheel.
The Sentiment is from Perfect Punches, the DSP is the Festival of Prints.
Colour Combo is the old faithful Christmas colours of
Old Olive, Cherry Cobbler and Very Vanilla.

Monday 3 September 2012

Twitterpated Sun Visor

Today I am off to golf so it's a quick posting.  Here is my refurbished golfing sun visor. 
 It had got a bit tatty and scruffy looking, so I decided to give it a make-over.  
I stuck Twitterpated fabric onto it using the Big Shot Mutipurpose adhesive sheet 
which you iron on.  I then sealed the edges with Tombow. 
 I added my initial in Basic Rhinestones - and there you have it.  Ta da!!
Looks like I will need it today as well!!


Wish me luck !!

Sunday 2 September 2012

Scentsational Season

Had a play this morning with the Scentsational Season Stamp set and the Framelits Holiday Collection
The framelits make short work of cutting out the images from this stampset!
Here are two cards that I made, layering the trees onto a square of Champagne Glimmer paper.
Sentiment from Perfect Punches


And here is a line up of the various stamps cut out with their respective dies.


Might play a little longer this afternoon once I've prepared for our Sunday dinner!!

Saturday 1 September 2012

Glimmer Merry Minis

From the new Seasonal Catalogue, here I've used the Merry Minis set of 3 punches with the
 Champagne Glimmer Paper to make a very clean and simple Inchies card.
I layered 9 x 1" squares of Very Vanilla, edged in Gumball Green Ink, firstly onto a 9cm square of Very Vanilla, then onto a 9.5 cm square of Gumball Green on top of a 5" square base card of Very Vanilla.


 I have only just taken this picture, and under the artificial light the colours are very false. 
 However I think that you can see the overall effect,
I'll take another picture tomorrow in daylight.